12 Slightly Advanced Brewing Tips and Techniques
Author: DANIEL J. LEONARD
As a brewer, I sometimes kick myself for not figuring out certain things (often simple things) that I think I should have known earlier on. This list is mainly about those things.
I assume many brewers probably learned several of the tips and techniques on this list earlier in their brewing careers, but for others (like me) it took a little longer to sink in.
So with that, here are...
12 Slightly Advanced Brewing Tips and Techniques
1. The Emergency Brew Kit
Not having the supplies you need when you need them can be a real pain in the acetaldehyde, especially if a nearby homebrew shop isn’t available.
With experience, each brewer figures out what backup supplies they need in their emergency kit, but here are just a few suggestions that might save you some trouble:
A) For brewers using a propane tank for their burners, always have a spare propane tank with some fuel.
B) For bottlers, keep at least 100 spare caps in your emergency kit.
C) Spare tubing can be helpful for when you find mold or some other gunk growing in your existing tubing.
D) An extra plastic fermentation bucket can come in handy almost any brew session.
F) If you’re into water chemistry, it wouldn’t hurt to have extra calcium chloride, gypsum and lactic acid on hand.
E) If you consistently brew with the same yeast strain(s), then having some spare yeast of that particular variety can come in handy in a pinch.
Speaking of yeast, although yeast companies generally put a “best before” date on their products, there is no set time limit on how long yeast will live, though at least one brewery was able to brew a beer with yeast that was estimated to be about 45 million years old. (YMMV.)
That said, conventional wisdom suggests that dry yeast lasts longer than liquid, but I’ve successfully brewed a beer with (refrigerated) liquid yeast that was more than 5.5 years past its “best before” date with no starter and into a high gravity wort (1.116 SG). It took a few months to ferment down, but the finished beer was tasty. (Again, YMMV.)
When using “old” yeast, it’s not a terrible idea to make a starter to see if any yeast is still viable, and if so increase the cell count (if time permits).
2. Reducing the ABV or Starting Gravity by Adding Water
Sometimes you over-shoot your starting gravity or end up with too much booze after fermentation is complete. In both cases, adding sterilized water will help bring your brew back in line.
Diluting alcohol content with water is a common practice used by distillers, and thankfully there’s a calculator that will tell you how much water to add to your brew to dilute it to the approximate ABV you want.
For example, let’s say you brewed 5 gallons of beer with an ABV of 10%, but you want to dilute the ABV down to 9%. Simply plug in those figures into the calculator, and you’ll see that you’d need to add 0.556 gallons of water to hit your 9% ABV target.

Alternatively, you can input your figures into almost any beer recipe calculator and simply increase the batch size volume until you land on the ABV you are targeting, and simply add the additional amount of water to your beer.
Just keep in mind that the more you dilute your beer, the more the IBUs are reduced, although sometimes this reduction is negligible. That said, IBUs can be adjusted after the boil as well.
3. Increasing IBUs After the Boil
Sometimes you may want to increase the IBUs of your beer after the boil. This can be done relatively simply by boiling the desired amount of hops in a small amount of water for a certain amount of time, and then adding that “hop-tea” to the beer.
To determine the approximate amount of hops and boil time needed to increase the IBUs to your desired level, you can use an online beer recipe calculator to enter your original recipe, and then make adjustments to the hop portion of the calculator until you reach your target. Typically the longer the boil time, the more that the IBUs will increase (up to a limit).
4. Paying Attention to Alpha Acids
When I first started brewing many moons ago, I made a crowd-pleasing German Hefeweizen that just seemed to nail the classic style profile on all fronts. When I attempted to re-brew the beer, it turned out too sweet.
The original recipe called for one ounce of Hallertauer at 6% AA, and that’s exactly what I used the first time. However the next time I brewed it, I used the same hop variety, but didn’t notice the AAs listed on the hops were at 3% instead of 6%. I didn’t realize that even though I was using the same kind of hop, the level of alpha acids in the hop can vary from crop to crop which can increase or decrease the level of bitterness in your beer.
The lesson learned was to pay attention to the alpha acids of the hops you’re buying and adjust the amount of hops needed accordingly. For example, if your recipe calls for 1 ounce of hops with 6% AA, but the hops you’re using are only 3% AA, then simply use 2 ounces of 3% AA hops to achieve the same level of bitterness.
5. DIY Measurements
From the very first brew session, it's pretty clear that a large part of brewing involves measuring things including specific amounts of water, grain, hops, and calculating things like IBUs, ABV, etc. There are many devices that can be used to help with certain measurements like a sight gauge attached to a brew kettle to help measure the temperature and volume of the water/wort, hydrometers and online calculators for ABV, however there are a few areas where you may need to DIY the measurements.
For example, if using a glass carboy or other vessel where the volume isn't marked, it can be helpful to notate the volume increments on the vessel with a permanent marker.
In addition, for those who use Star San, the recommended ratio is 1 ounce of Star San per 5 gallons of water, but I found that only 1 gallon of sanitizer is all that I typically need per brew session. In the past, I'd do the math to determine how many milliliters I'd need for just one gallon, but then forget it every time until I just wrote down the amount needed and taped it to the Star San bottle.
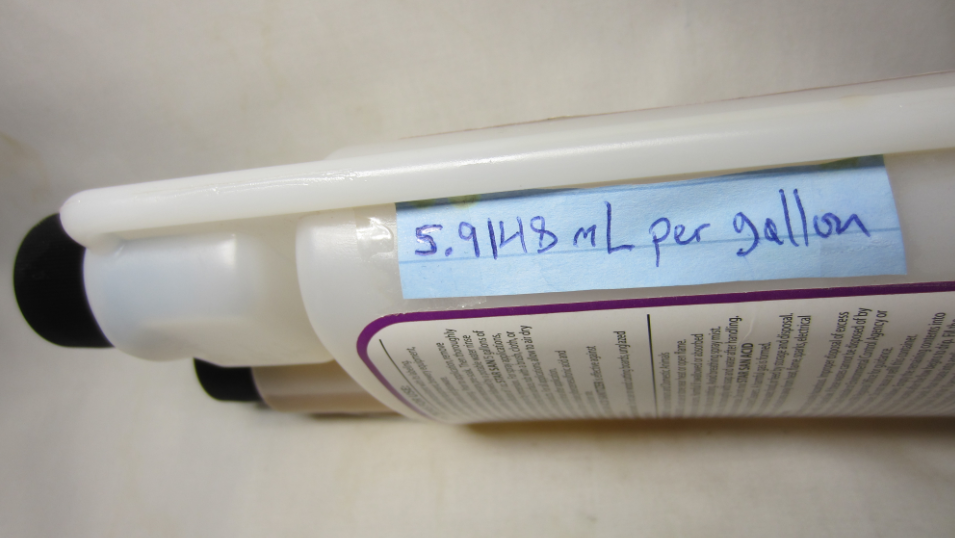
By the way, the amount of Star San adjusted for a 1 gallon batch would be 5.9147 mL, which I just round up to 6 mL and measure to just slightly over the 5 mL line on the Star San bottle. (1 oz per 5 gallons; 1 oz = 29.5735 mL / 5 gallons = 5.9147 mL per gallon)
6. Multitasking
Sometimes brewing can eat up an entire day, depending on your equipment and recipe. However, multiple tasks can often be done at the same time in order to reduce the length of the brew day.
Here are just a few I’ve learned:
A) Setting up equipment and bringing brewing water to a boil while mashing in a separate vessel.
B) Cleaning, bottling, kegging, checking recipe, etc. during the boil and while chilling the wort.
7. Pitching Onto a Yeast Cake
In the past, I’ve avoided pitching fresh wort onto a clean yeast cake for two main reasons:
A) I typically brew different styles of beer that require different yeast strains from batch to batch, and
B) I don’t really like to bottle and brew on the same day or weekend.
But then I figured: to heck with it. Just brew the same style of beer back-to-back and put in the extra effort to brew and bottle on the same day/weekend. Yes, it’s asking a lot to bottle and brew on the same day, but it feels great not having to make a yeast starter and also getting at least one more batch of beer out of the same yeast. (After racking the beer off a yeast cake, I will place a lid over the bucket with the yeast cake in it, and pitch fresh wort onto the cake within 24 hours to reduce the risk of infection.)
Pitching fresh wort onto an existing yeast cake works best when you are making the exact (or very similar) recipe as before because remnants from the previous batch can carry over to the next. For example, if you dumped a bunch of cherries into your primary and want to use that same yeast cake to make a clean ale or lager next, don’t be surprised if your following batch has some cherry character to it.
Of course, you can always wash yeast from a fresh yeast cake to use later, but that’s more work, and personally there’s just something more gratifying about pitching a fresh batch of wort onto a clean and healthy yeast cake.
8. Allowing the Trub to Settle in the Boil Kettle
I use a wort chiller to chill my boiled wort in a 15.5 gallon kettle that has a ball valve spigot at the bottom of the kettle. Inside the bottom of the kettle is a stainless steel braided filter that helps keep trub behind in the kettle.
The problem was that the filter kept getting clogged, and it took years for me to figure out why.
When using a chiller, you can decrease the time it takes to chill the wort by stirring it around with a long spoon. The problem with doing this is that it also stirs around all the trub in the kettle which clogs up the filter.
When I stopped stirring the wort when chilling it, the trub simply settled to the bottom of the kettle (after about 20-30 minutes), and prevented the filter from getting clogged. It might take a little longer to cool, but now my wort is much clearer and transfers through the filter and out of the kettle like a dream.
9. Under Cover Brewing
Like many homebrewers, I brew with an outdoor burner which is fueled by a propane tank. Of course, two potential dangers of brewing with an outdoor burner are using it in an enclosed space like a closed garage where odorless carbon monoxide gas can build up and eventually kill you, or the burner or propane tank somehow starting an unintended fire which then burns your house down.
For those reasons, I had always brewed out away from the house, which unfortunately leaves me and my brew exposed to the elements. After years of sun burns, jerry-rigging temporary rain shelters over my kettle, and protecting my kettle from falling leaves, I thought there must be a better way, and I finally decided to put my brewing setup under a covered area away from the house.
To be clear, I’m not recommending anyone ignore the safety manual of their particular burner. Some safety manuals warn not to use the burner in a building, home, garage, tent, and other enclosed areas, on wooden decks, asphalt or plastic, under roof overhangs, on a porch, balcony, carport, and at garage door opening. Some safety manuals might even warn against using a burner under any overhead construction, but this warning is aimed at those cooking grease or oil as nearby objects could accidentally ignite should an oil/grease fire occur.
In all cases, be careful and brew at your own risk.
10. Knowing When to Walk Away From the Kettle
Sometimes surprises or other plans get in the middle of brew day. However, there is a key time during the process that will allow you to push pause on your brew day if needed, and this time is at the end of the boil.
As long as you’ve budgeted enough time to make it through your boil, then you can kill the heat, put a lid on kettle, come back a few hours later, bring it back to a boil for 5 minutes just to be safe, chill the wort and close out your brew day has per normal.
Just remember that the longer you allow your unattended wort to cool, the possibility of an unwanted infection may increase; for example, some lacto strains can survive up to 138 degrees Fahrenheit (58.89 C). It’s probably not very likely that lacto or some other beer spoiling organism would get into a coved recently boiled kettle, but you never know.
And of course, it’s not really a great idea to leave hot unattended wort out where a child or pet might somehow injure themselves with it.
11. Recirculating Wort Chillers, Making Your Own Ice and Employing Ice Packs
Sometimes homebrewers run into trouble getting the wort to cool all the way down to pitching temperature quickly, especially when using an immersion chiller in the summer when the lowest temperature that can be reached is whatever the temperature of the water is that’s coming out of the hose, which may be too warm (80-100° F/26.67-37.78° C).
One common solution to the problem is to first use ground water to chill your wort to around 120-140° F/48.89-60° C, collecting the hot runoff water for other uses. Then employ a recirculating wort chiller by placing a small pump (submersible sump pump, aquarium pump, fountain pump, etc.) inside of a cooler or bucket filled with ice and water. The cold water is then pumped through the wort chiller and the hot water comes out the other end and collected in a bucket (etc.) for other uses. When the water coming out of wort chiller is cool enough (80-100° F/26.67-37.78° C), that outflow hose can then be placed into the bucket of ice and recirculated.
It can improve water flow when the pump is placed at the same level as the kettle, and depending on the pump, it’s possible to achieve lager temperatures in under 20 minutes depending on the power of your pump; 500 gph (gallons per hour) is probably the minimum power you’d want, but for not much more money you can get a ¼ HP (horse power) pump that pumps 1800 gph (30gpm).
If you don’t have a recirculating wort chiller, another solution is to first cool the wort with the chiller until it is warm (100° F/37.78° C), and then rack the warm beer into a plastic fermentation bucket. Then place that bucket into a larger bucket filled with cold water and ice until the ideal pitching temperature is reached. This method is sometimes called a fermentor bath or ice bath.
Bagged ice from the store can be relatively inexpensive, but making your own ice is still almost always more cost-effective. (One estimate put the cost of electricity for producing 1 kilogram of ice at 1.26 cents). If freezer space is an issue, you can make individual units of ice in plastic Tupperware, big plastic cups, empty soda/milk/water bottles, etc. and place them in different unused parts of your freezer.
If you’re sort on ice, remember that spare ice packs can be used to help chill the water in the ice bath or recirculating wort chiller setup, and in a pinch, other sealed frozen items from the freezer can be thrown into the ice bath too.
12. Adding Fresh Yeast When Bottling High ABV, Lagered, or Bulk-Aged Beers
I’d read that it’s a good insurance policy to use some fresh dry yeast (about 1 gram per 5 gallons) when bulk priming a high ABV, lagered or bulk-aged beer, but I never really followed that advice until I ended up with a flat high ABV bulk-aged beer that still hadn’t carbed up after being bottle-conditioned for months.
So whenever I lager, brew a high ABV beer or bulk-age a beer in carboys, I add a bit of yeast when bulk priming just to be sure. (Obviously, this is not a concern for those brewers who keg their beer.)
Like this tutorial? Questions, comments, free beer? Feel free to drop me a line at dan@beersyndicate.com, or follow us on Twitter at twitter.com/beersyndicate.
From The Blog
Tips for Craft Brewery Success
The best business secrets wikileaked from the private records of the most successful craft breweries in the United States.
Beer Names You Might Be Saying Wrong
Enlighten yourself, but please don't correct others. It's just one of those Catch-69 situations, like when somebody has ketchup on their face.
The Beer Quiz
What's your beer IQ? This test measures an individual’s beer knowledge through a series of questions of varying levels of difficulty: Normal, Hard, and Insane.
Homebrewing Techniques
Beat the Stuck Fermentation Monster
You've brewed the perfect wort. You bullseyed your strike temp, you had a most excellent cold break, your OG was right on the money...
How to Cork Belgian Beer Bottles
So you wanna up your bottling game, huh? Well, you've come to the right place.
Top 40 Ways to Improve Your Homebrew
Admit it: No matter if in a DeLorean, TARDIS, or a hot tub, we’ve all thought about what advice we might give our younger selves if we could go back in time.
DIY Projects
How to Polish a Keg
Shining up your keg will probably not improve the taste of your beer, but it looks cool and inspires epic brewing sessions!
Convert a Refrigerator Into a Fermentation Chamber
Decided to take a huge step in improving your homebrew and set up a temperature controlled fermentation system, have ya? Smart thinking.
How to Convert a Keg Into a Brew Kettle
Convert that old keg into a brewing kettle. The advantages of using a keg for homebrewing pretty much come down to quality and cost.
|
|