How to Make Beer Labels
By DANIEL J. LEONARD
NOTE: This tutorial can be used to make DIY labels for just about anything. Wine bottles, cider, soda, pickles… you name it. We just prefer beer... and cider. Also, if you just want to download customizable label templates for printing on your own, skip down to "PRE-MEASURED CUSTOMIZABLE LABEL TEMPLATES FORMATTED IN MICROSOFT WORD" and then skip down to "PRINTING, CUTTING, & GLUING".]
This tutorial will cover:
1. Label Design
A) When to use Full Color or only Black & White Labels
B) Front Label Design
i) Naming the Beer, Cider, Wine, etc.
ii) Selecting an Image
C) Back Label Design
2. Free Pre-Measured Customizable Label Templates Formatted in Microsoft Word
3. Creating and Formatting Labels in Microsoft Word
A) Adjusting Label Size in MS Word
B) Adding an Image to a Label in MS Word
C) Duplicating Labels in MS Word
D) Maximizing Label Placement on a MS Word Document
4. Printing, Cutting, and Gluing
5. Online Label Printing Options
At BeerSyndicate, we’re obsessed with beer labels. This is why we have the largest searchable collection of beer labels on the net. We’re also obsessed with sharing homebrewing ideas, so it’s only natural we share a few tips on what we’ve learned about how to make nice looking beer labels with minimal effort and minimal cost for your most worthy homebrew.
Needless to say, creating a label for your homebrew implies you’ll need to bottle some beer, wine, cider, mead, etc.
And let’s face it: Bottling can be a pain. [Well, it can be less of a pain if you use some of the nifty tips we put together on (you guessed it) bottling.] Certainly, adding the task of designing and slapping a label onto a bottle does not make the bottling process go by any faster.
That said, every so often, a homebrewer crafts a beer so epic that the brew has earned the right to be blessed with a name and baptized with a label. These are the glorious beers that will most likely be shared with others and may one day, if the fates ordain, appear on the line up in your very own brewery. And while a brew should stand on its own merit, a label should indicate that the brewer was exceptionally proud of said beer thus earning the honor of a label.
Of course, sometimes special occasions such as a wedding, graduation, sporting event, or holiday warrant the extra effort of creating a label as well, but making a label doesn’t have to be an ordeal.
So let’s look at the quick and easy way you can design and physically produce great looking labels yourself.
LABEL DESIGN
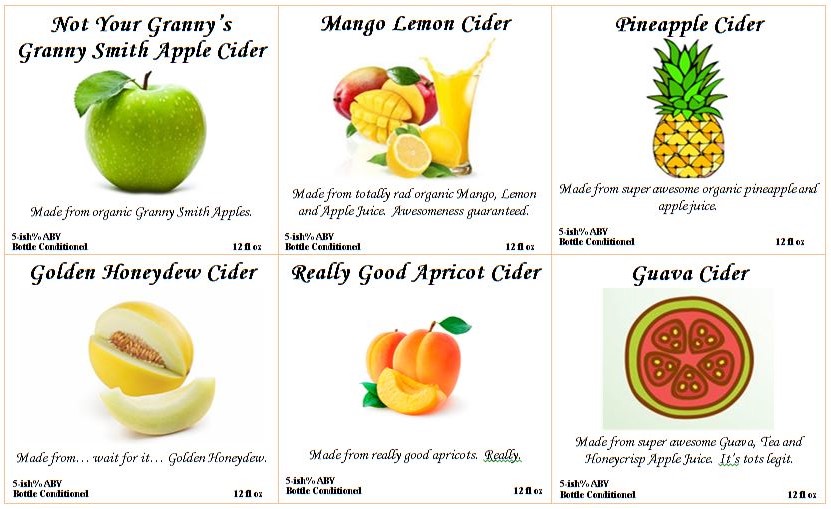
Unlike when creating labels at the commercial level, there really are no rules governing what information may or may not be included on your label as a homebrewer. Of course, you certainly can emulate commercial labels by including the alcohol content of the brew (ABV), size of the container (12 oz, 22 oz, etc.), “brewery” and beer name, any special ingredients, type of beverage (beer, cider), bottling date, and location of your “brewery”. Some breweries like to add other details like whether the beer was bottle conditioned, suggested food pairings, IBUs, awards won, etc.
[Need some inspiration? Check out the vast assortment of commercial labels in our label gallery.]
You’ve probably noticed that commercial beer bottles commonly have a label on the front and back, and sometimes a ringer label around the neck of the bottle. For the sake of simplicity, we’ll only be considering front and back labels, both of which can be relatively easily constructed using Microsoft Word. But first, a few words about organizing your concept.
COLOR OR BLACK & WHITE
The very first label I made was black & white and printed with an ink jet printer on plain old white computer paper. The only "color" came from the fact that I had added blue ink into the black ink cartridge. As you can imagine, it wasn’t too fancy.
The problem with that label was that not only would the ink run and smear when it came in contact with liquid (ice bucket, condensation, palm sweat), but also a monochrome ink label printed on a piece of computer paper looks kind of, well, cheap. Not to mention, people weren't super stoked about getting computer ink on their hands and possibly clothes.
This is not to say that you can’t make great labels printed in black & white (especially if you're working with black & white images), but to avoid the ink smudge problem, use a laser printer instead of ink jet, and consider printing the label on colored paper or résumé paper to give your label some life. That way, you are technically producing a color label without the need for a color laser printer.
For example, if you want to make a vintage looking label, print a label in black & white with a laser printer, but use ivory colored parchment paper. Parchment paper can sometimes be a bit thick when it comes time to glue the label on to the bottle, so we’d recommend a thinner cut [24 lb. (90 g/m2)].
We’ve had excellent results using Southworth Fine Parchment Paper (here a few label examples below).
COLOR PRINTING MAGIC
While labels printed on computer paper with an ink jet printer look and feel subpar, using computer paper in combination with a color laser printer is a whole different story, and if you haven't tried it yet, you will be pleasantly amazed at the difference.
With a color laser printer, not only will the colors not run and create a mess at the first sign of moisture, your labels will actually be smooth to the touch, much like when you run your thumb across most commercial labels. Simply create your label in full color (full color background, etc.), save your design on a USB stick, and have them printed at a copy shop. You can even use the copy shop's paper cutters for free to cut your labels once they're printed.
This method is by far the most cost effective DIY way of printing professional quality full color labels.
Thinking through whether or not you will be creating a simple black & white label on specialty paper or putting the extra effort into designing a full color label can save you time up front. And speaking of front…
FRONT LABEL
The front label often consists of some text and an image. As mentioned above, the text on the front of the label frequently includes the name and style of the beer, name of the brewery, location, ABV, etc., whereas the image can vary greatly and may include an image of a relevant landscape, a brewery/brand related theme (think of the sea and fish imagery that Ballast Point Brewing Co. uses), culturally significant imagery (coat of arms, national or regional emblem/symbol), the ingredients used in the beer, or the person or thing the beer is named after.
NAMING YOUR BEER
Naming a beer can be as generic or personal as you want depending on your reason for making the label. If you’re simply trying to indicate the type of beer/cider you brewed for identification purposes, then a basic matter-of-fact label will do.
For example, let’s say you brewed a tasty lemon Shandy and don’t want to get too creative. You could call your beer “Lemon Shandy” or “Sour Shandy”. Simple.
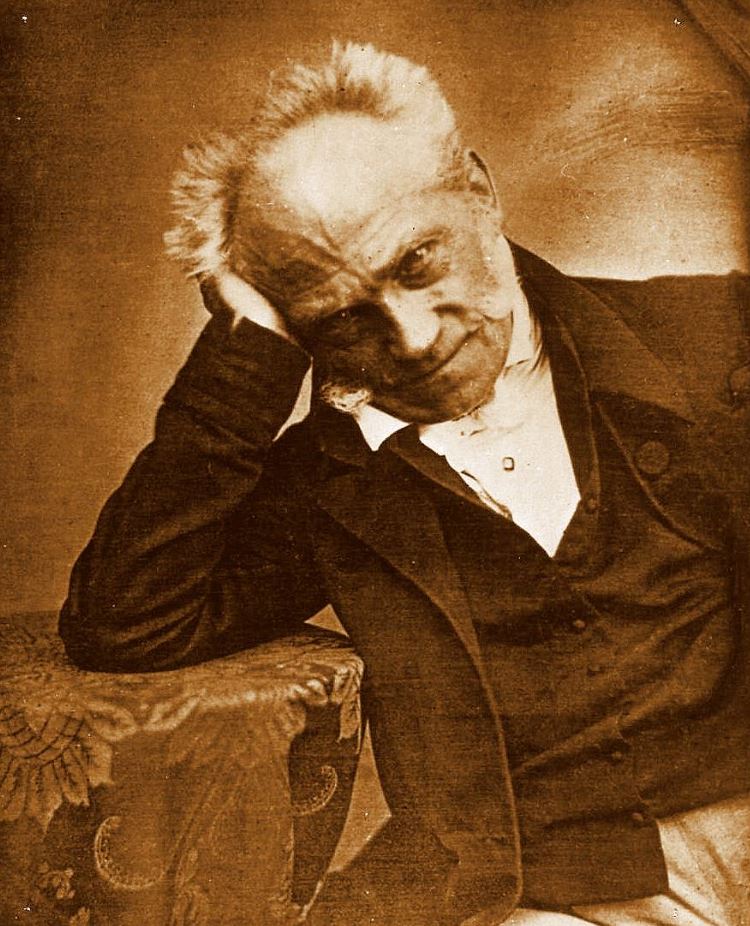
If you wanted to add a bit of a personal touch, consider cross-referencing one of your interests for inspiration. For example, let’s say you’re into philosophy and you want to name your beer after a famous philosopher. In the Shandy example above, you might think of famous philosophers whose name start with the letter ‘S’ like Schopenhauer, Sartre, or Spinoza, and name your brew after one of them. “Schopenhauer's Sour Shandy” has a nice ring to it.
Choosing the right font for your text is really up to you, but if you’re having trouble finding the perfect font for the theme of your label, remember there are additional fonts online you can download for free. For instance, if you’re making a movie-inspired label, you can download the ‘Steel Tongs Font’ for a spot on movie poster font.
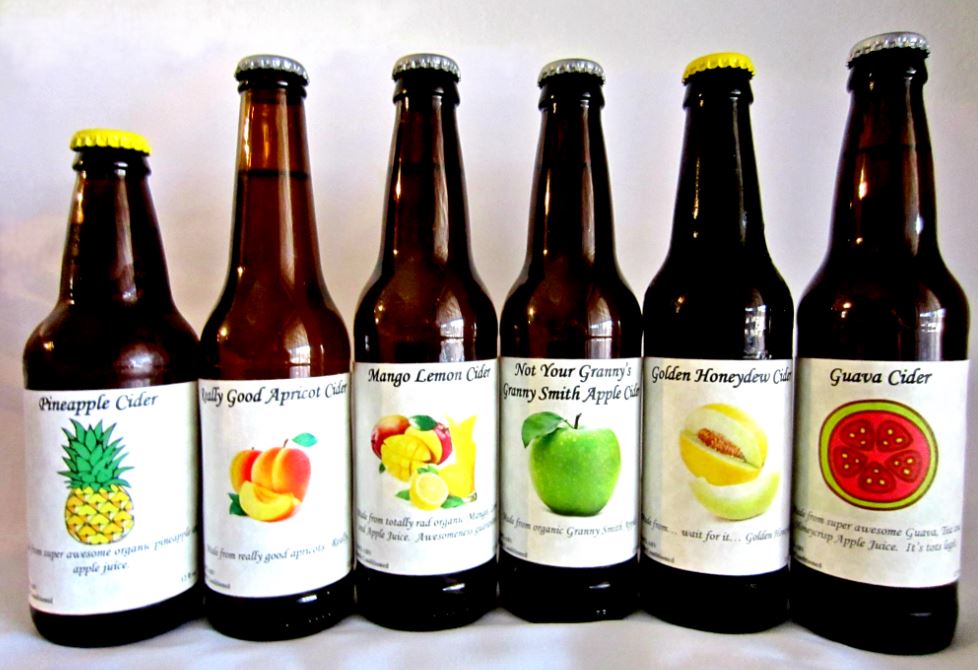
IMAGE
You don’t need to have a degree in graphic design or even know how to draw to create a great looking image for your beer label. All that’s required is an internet connection, some very elementary web searching skills, and just a tiny bit of creativity.
For a basic “Shandy” label image, let’s play the idea association game. For example, you know that Shandy is a beer that is 50% beer and 50% lemonade, so let’s say you do a quick google search for “lemons”, and then click on “Images”. Perhaps then you find an image of a lemon tree or something else that you like: just click on the image(s) you like, then right-click on the image and select “save image as…”, and save it someplace on your computer you can find later.
If you’re collecting a variety of images to choose from or thinking of producing multiple labels with different images, consider creating a folder on your computer and naming it “Beer Label Images” or something else that makes sense, and then placing your images there.
If you want to get a bit more creative, let’s run with the “Schopenhauer's Sour Shandy” example from above. The imagery of the label can be as simple as finding an image of the philosopher online (or whatever you’re in to), and adding it to your label. Since the below image of Schopenhauer is black & white (sepia-toned), it lends itself to producing a black & white label. This image seems to fit well with our sour theme.
If your image needs some minor editing (cropping), most adjustments can be made in Microsoft Paint, a free online photo editor, or if you really want to go nuts, Photoshop.
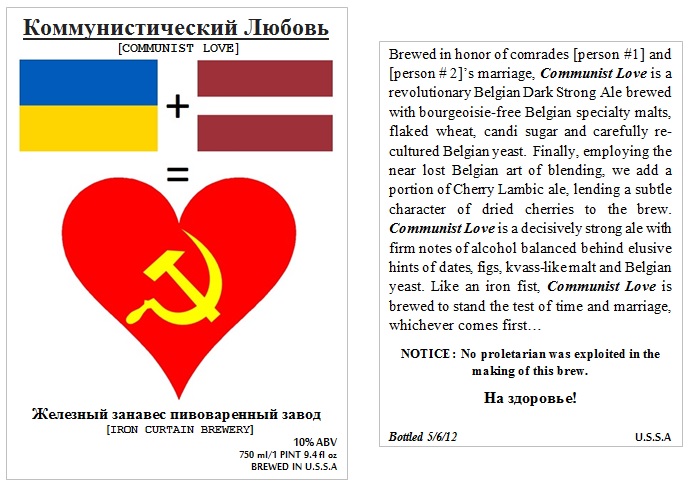
If you’re creating a label for a special event like a wedding, you could incorporate a picture that you’ve taken of the allegedly happy couple, or maybe find a photo on one of the couples Facebook page that would work. If you don't have photos to work with, you can just get creative. For example, here's a wedding label created for a Ukrainian friend of mine who was getting married to a Latvian:
If you’re artistically inclined but not necessarily a digital artist, you can always draw an image you want to you use and then scan it to your computer. For that matter, you could scan ANYTHING you want (old picture of a family member, etc.), and use it in your label design.
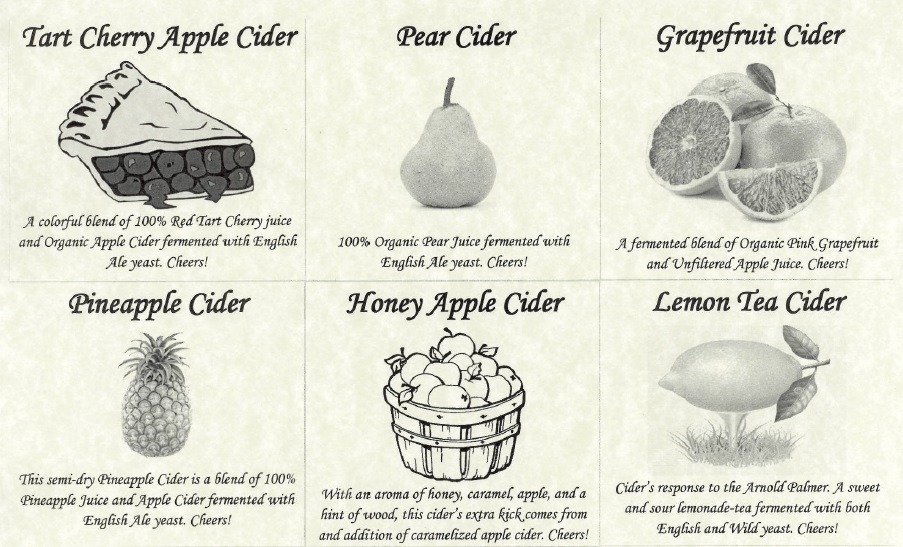
BACK LABEL
If a back label is included, it will generally contain mostly (if not exclusively) text to better describe the beer including any special ingredients or processes used, the inspiration for or philosophy behind the brew, a dedication, or any other particular detail you want to convey that may not have been mentioned on the front label. Going back to the “Schopenhauer's Sour Shandy” example, you may want to explain some information about who Schopenhauer was or how something from his philosophy (pessimism, epistemological idealism, etc.) applies to the beer.
.JPG)
PRE-MEASURED CUSTOMIZABLE LABEL TEMPLATES FORMATTED IN MICROSOFT WORD
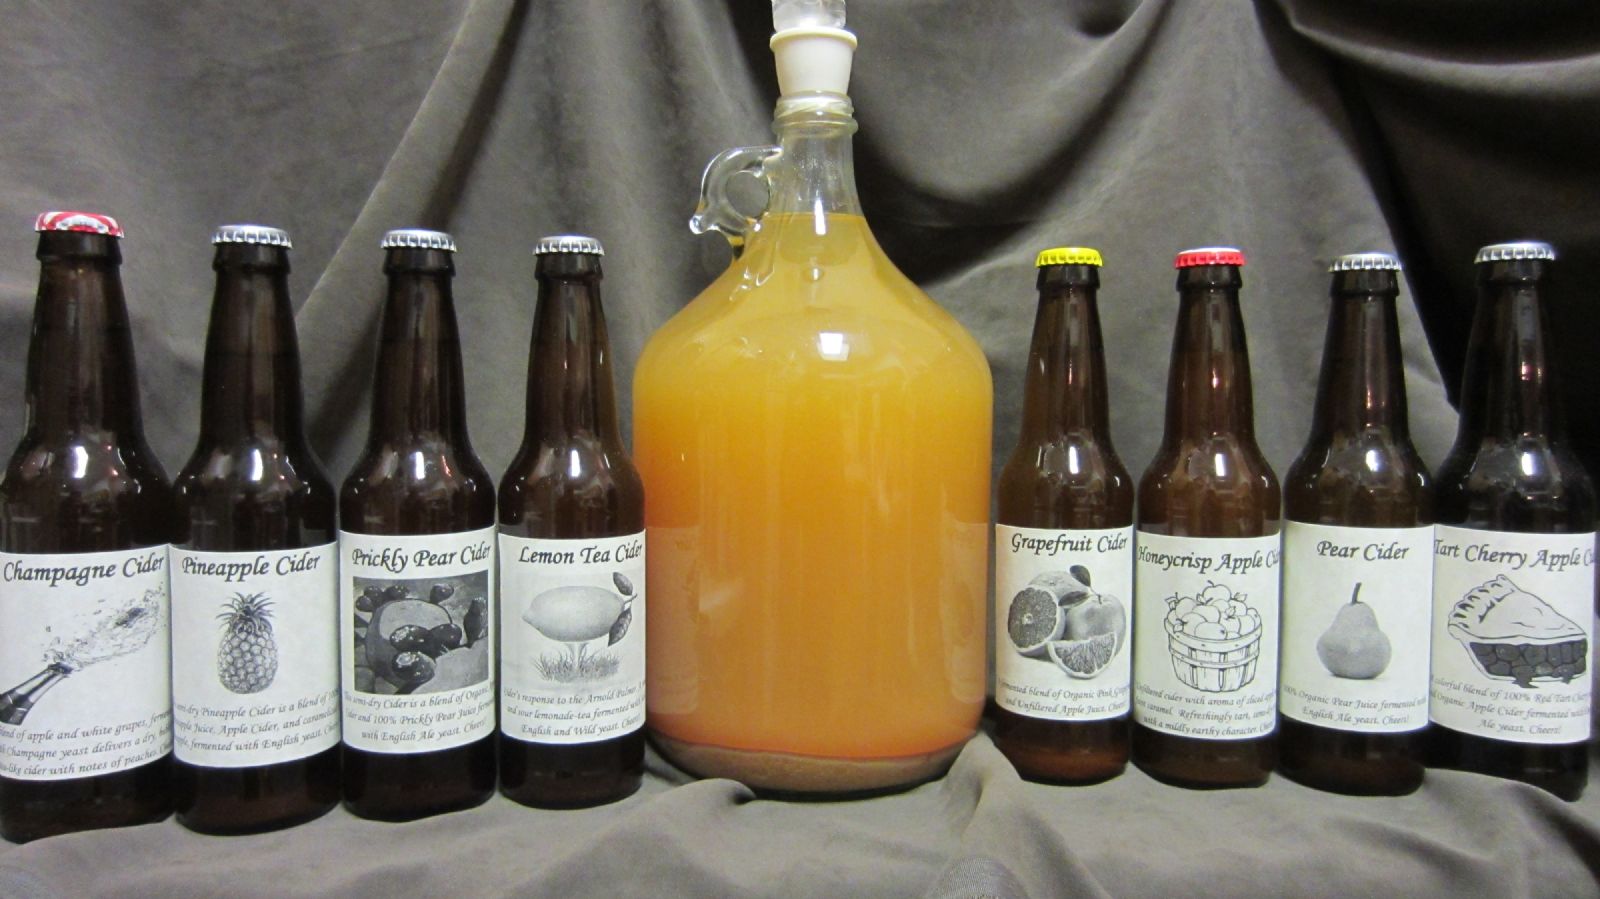
Here’s where we’re about to do you a real solid and simply allow you to download and use our label templates which have been maximized for space efficiency. These labels work well with black & white designs on specialty paper. Sizes and alignment have already been maximized for front and back labels for both 12 oz long neck bottles and 22 oz/750 ml bottles. Always remember to print a test copy of your label sheet on regular computer paper to ensure the image looks correct (no cut-off text, etc.) before printing the final version on more expensive paper or in color.
Front Label Template (22 oz/750 ml)
Back Label Template (22 oz/750 ml)
.JPG)
If you’re pretty handy with Microsoft Word, you should be able to make adjustments and customize our label templates to fit your needs pretty easily. If you really want to know how to create your own labels on Microsoft Word from scratch, read on, or just skim to the section of the tutorial you need below… You might need the section on “ADDING AN IMAGE TO THE LABEL”, but the short version is just copy and paste your image over to the existing image on the template. Presto.
I mean, you made it this far through this 15 billion page tutorial, so Happy Hanukkah… or whatever holiday you celebrate where you get free stuff.
If you feel you've got the hang of the templates, feel free to skip down to the section on “PRINTING, CUTTING, & GLUING”. Good stuff.
PUTTING IT ALL TOGETHER: CREATING AND FORMATTING LABELS IN MICROSOFT WORD
Now that you have your front and possibly back label figured out (at least conceptually), it’s time to put it all together using Microsoft Word.
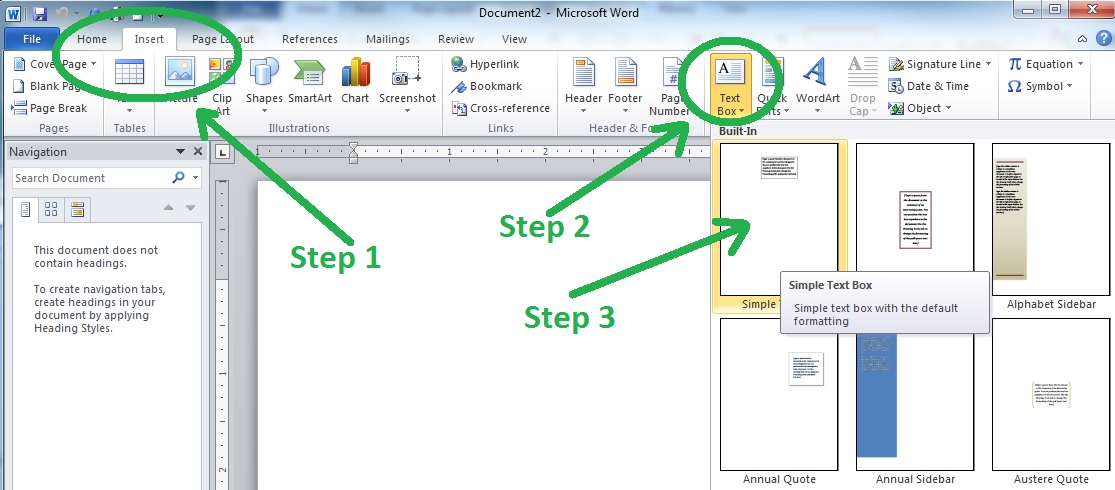
When creating the front label, open a new document in Microsoft Word, click on the ‘Insert’ tab, then the ‘Text Box’ button in the ‘Text’ field, and finally the first text box offered, or the 'Simple Text Box'.
LABEL SIZE
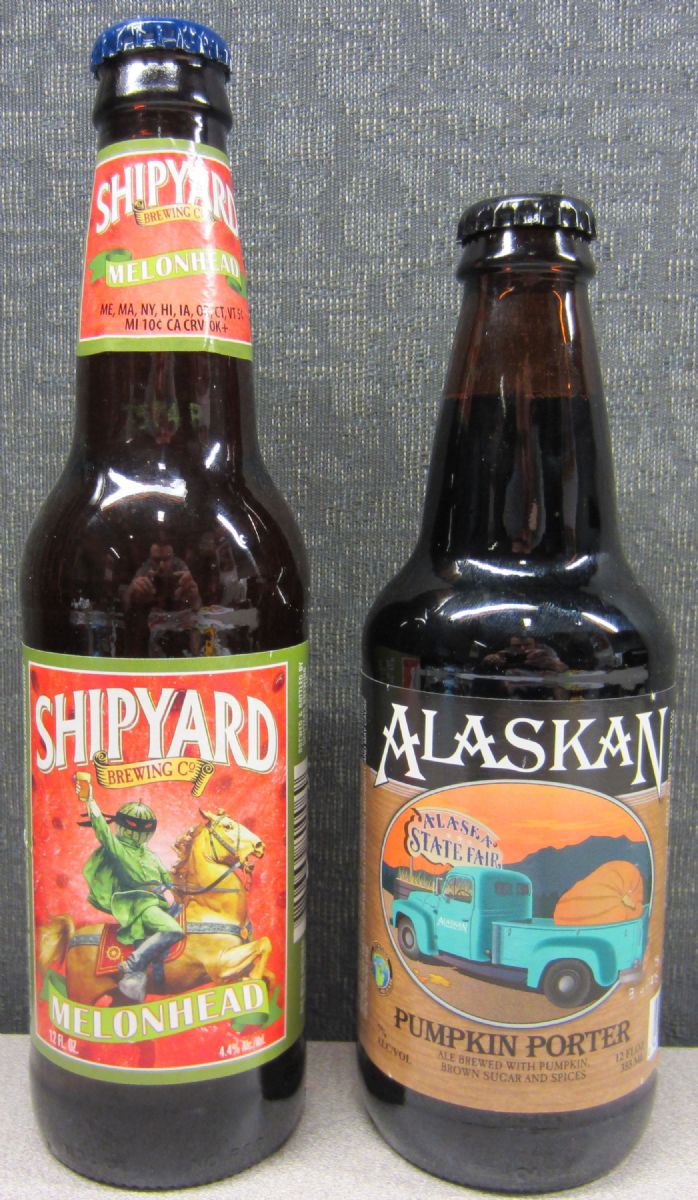
Next, you’ll need to adjust the size of text box to go along with the size and style of the bottle you’re using. For the standard 12 oz long neck bottles, I prefer a size of 3 ½” x 3” for the front label, and 3 ½” x 2 ½” for the back label. For the more stout 12 oz heritage-style bottles (think Sierra Nevada, Alaskan, or Founders), you’re looking at a length of about 3 ¾” by a width of 3”. [Just for reference, Sierra Nevada labels are about 3 ½” x 3” for the front, and 2 3/8” x 2 ½” for the back.]
[The bottle on the left is an example of a standard 12 oz bottle, while the bottle on the rigth is a 12 oz heritage-style bottle.]
For 750 ml Belgian-style bottles or 22 oz bombers (see image below), I like to use a size of 5.25” x 4” for the front, and 4.35” x 3” for the back. Part of the reason for this size is so that you can fit four of these label sizes on one page to maximize space and reduce printing costs. Obviously, the bigger the bottle, the more text and other details you can add to your label. But by no means is there one standard label size, so you feel free to adjust your label sizes to suit your needs.
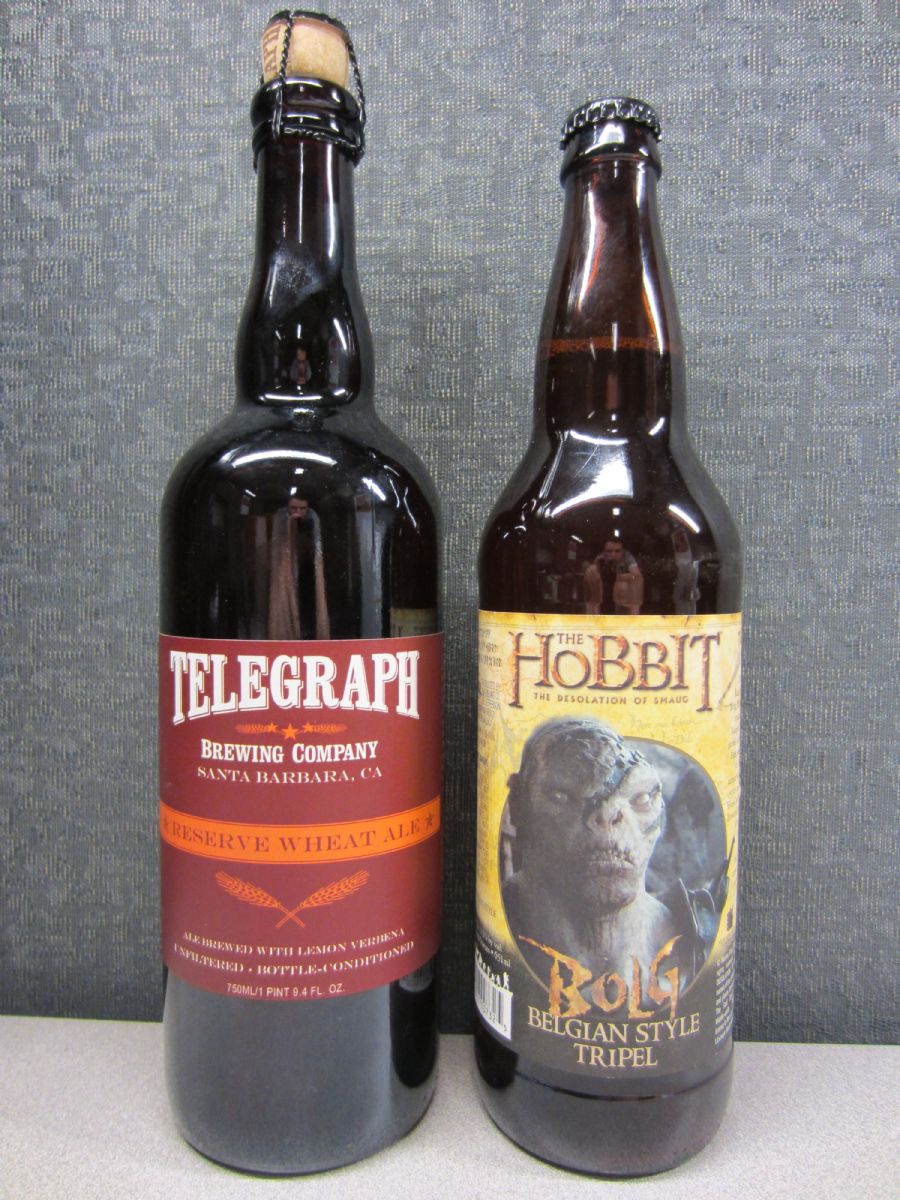
[The bottle on the left is an example of a 750 ml Belgian-style bottle, while the bottle on the rigth is a standard 22 oz bomber.]
To adjust the size of your text box, you can either activate the ‘ruler’ function by clicking to the ‘View’ tab, and click the ‘Ruler’ box (see below)...

OR, and probably the easier option, simply click inside the text box, which will automatically take you to the ‘Format’ tab, and on the far right, you will see the ‘Size’ box where you can manually enter the exact size of label you want.
.jpg)
Let’s assume for now that we’re working with the standard 12 oz bottles. After you have a text box open and have adjusted the size of the label (3 ½” x 3”, or 3.56” x 3.23” if you need the extra space), click inside the text box and type the name of your beer. Feel free to change the size and font of the text, and then center the text as well.
ADDING AN IMAGE TO THE LABEL
Next, open the image you’re planning on using, right-click on the image, and select ‘Copy’ from the menu. Go back to your text box on your Word document, click on the space directly after the text used to name your beer, press the ‘Enter’ or ‘Return’ key on your keyboard so that the cursor is now below the text, and then paste your image into the text box by either right-clicking and selecting ‘Paste’, or using the keyboard, holding down the ‘Ctrl’ key while pressing the ‘v’ key.
Make sure to center the image, if it isn't already.
After your image is on your label, you can adjust the size of the image by clicking on the image itself, and then clicking and dragging one of the handles (the little square or circle objects) around the border of the image.
If you’d like to add some additional text below the image, click on the space directly after the image (but still inside the text box), and press the ‘Enter’ or ‘Return’ key on your keyboard.
CREATING THE BACK LABEL IN MICROSOFT WORD
If you’re creating a back label (which isn’t always necessary), the process is basically the same as described above, except you’ll need to adjust the size of the text box, and will probably skip adding an image (see recommended 'back label' sizes above under “LABEL SIZES”).
REDUCING THE DARKNESS OF THE BORDER FOR CUTTING
To lighten the black border around your label so that it’s less visible, but still useful as a guideline when cutting:
1. Lift-click (or hover the mouse pointer) on the black border around your label (a four-way arrow should appear).
2. While the four-way arrow is visible, right-click.
3. Scroll to the bottom of the options box to where it says “Format Shape…”, and left-click.
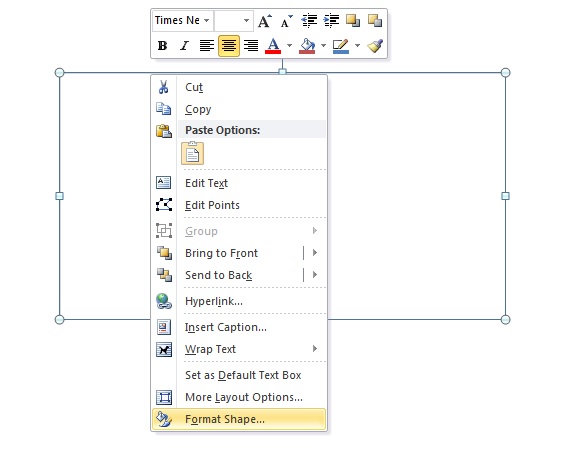
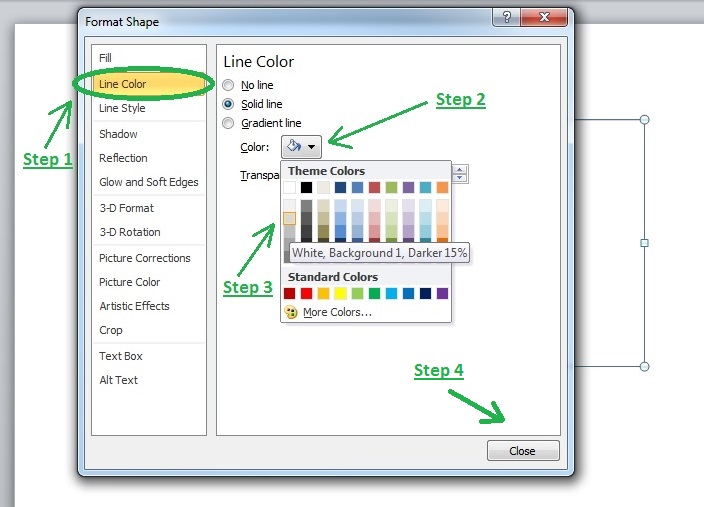
4. On the left row of options, click on “Line Color”.
5. Click on the paint bucket icon next to the word “Color:”, and select a lighter shaded color from the “Theme Color” box, and then click the “Close” box.
DUPLICATING LABELS
Now that your label is complete, you can easily make duplicates of your label for multiple bottles by simply right-clicking on border of your label, selecting “Copy” from the options, and then pasting on the same page.
Keep in mind that only six (long neck) labels can fit on a page using a size of 3 ½” x 3” (or 3.56” x 3.23”), and only four (bomber/Belgian) labels will fit if using a label size of 5.25” x 4”.
For long neck bottle labels of the size 3.56” x 3.23”, you will need to rotate the labels vertically to maximize space on your label document (see below); however four bomber-sized labels (5.25” x 4”) are already stretched vertically so no adjustment is needed.
MAXIMIZING THE NUMBER OF LABELS ON YOUR DOCUMENT
Depending on how many labels you are making, you may want to arrange the labels on your Word document in order to maximize the number of labels you can fit onto one page. Arranging labels side-by-side and perfectly aligned so that the borders run along the same line will help save time later on by allowing you to accurately cut multiple labels at the same time.
To maximize space for labels intended for use on long neck bottles using the dimensions described above (approximately 3.56” x 3.23”), you can rotate the labels vertically. Do to this, simply click on the text inside your text box, and a lime green circle will appear above the text box.
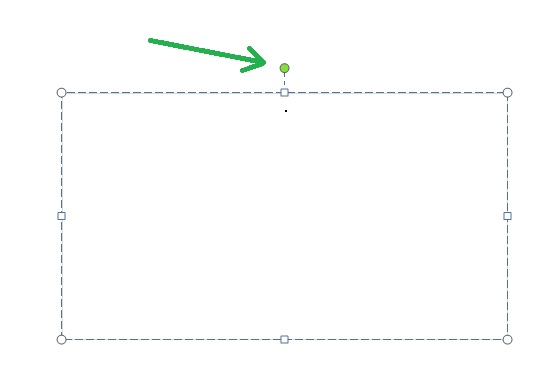
Next, hover the mouse pointer over the green circle until a circular black arrow appears, and then left-click and drag the text box to the left or right until it is perfectly vertical.
NOTE: When arranging labels of any size on a page, remember to align the labels so that all borders of the labels match perfectly which will enable you to cut multiple labels at the same time and save time.
PRINTING, CUTTING, & GLUING
By this point, your label(s) is created in Word, and you’re ready to print. Again, if at all possible, laser printing is strongly recommended over ink jet printing to prevent your label from smudging, etc.
When cutting your labels, you can use scissors, but there are better options. If you’re having your labels printed at a copy shop, they should have the standard guillotine style paper cutters available for use which work great, but we recommend only cutting one or two sheets at a time for accuracy.
Alternatively, you can use a paper trimmer which is accurate, cheaper, and easier to store/transport than a guillotine paper cutter. We use and recommend the Fiskars SureCut Personal 12" Paper Trimmer, which should run you about $20 on Amazon. Simply place your label sheet under the flip-up ruler, align the border of the label you want to cut with the silver alignment string on the trimmer, and slide the track black across the page. The paper trimmer is easy to use, quick, and cuts straight with little effort.
Some people use OnlineLabels.com to print their labels on peel-away sticky paper. Maybe not the most cost effective strategy, but it's an option. Other homebrewers also have reported good results using GorgTag for designing and printing labels.
SUPER QUICK LABELING
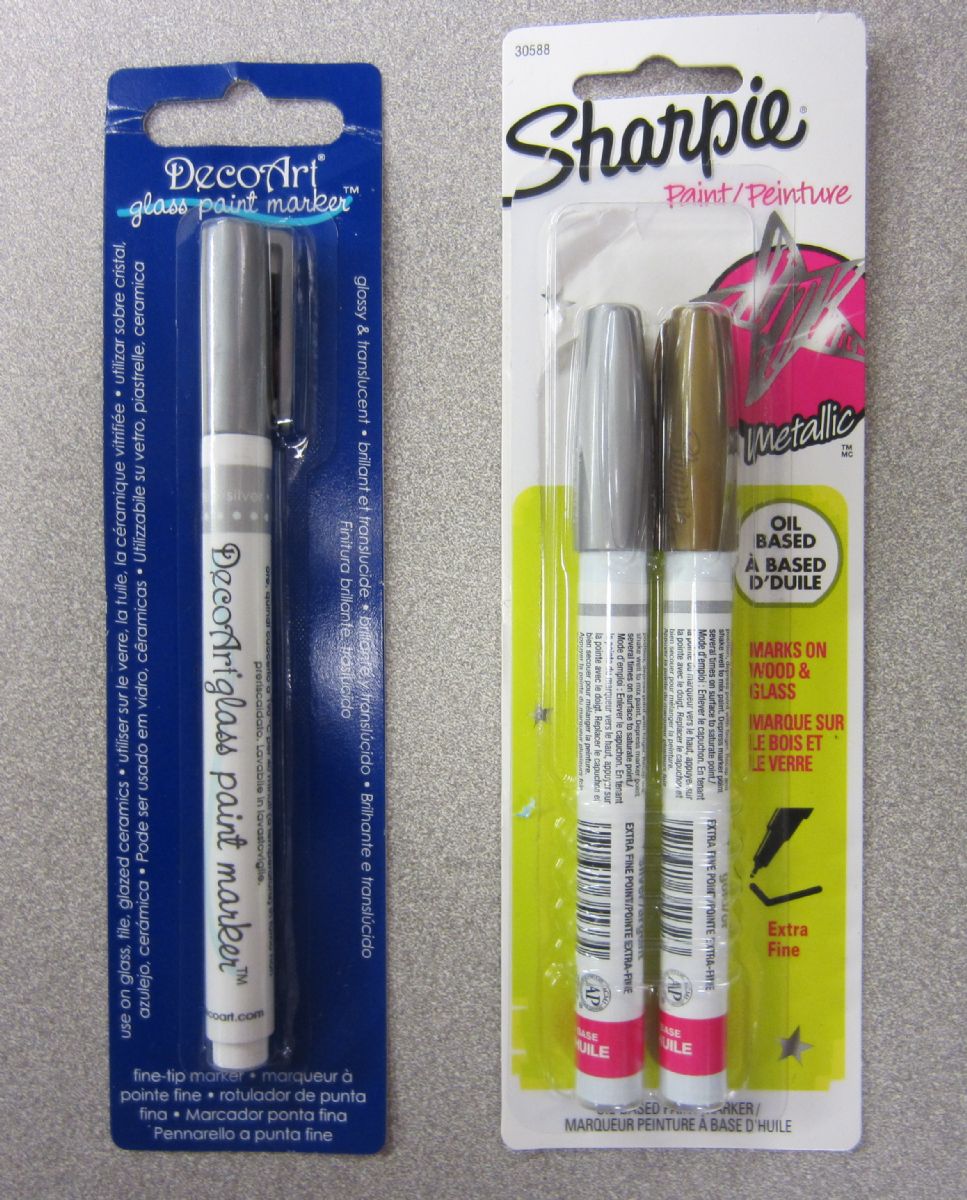
Ok, if you don’t have the time for all of this labeling business, you can always use a glass paint marker to write the name of your beer and anything else you want on your glass bottle.
We like DecoArt Glass Paint Markers, but Sharpie makes a decent oil-based glass marker as well (the “Extra Fine” tip marker is a bit too fine for us, but Sharpie also makes "Medium Point" markers as well).
Holy cow. Now that’s a label making tutorial!
Happy labeling!
[Disclaimer: Cool labels may not necessarily improve the quality of your homebrew, but then again maybe they will. Cheers.]
Like this tutorial? Questions, comments, free beer? Feel free to drop me a line at dan@beersyndicate.com, or follow us on Twitter at twitter.com/beersyndicate.
From The Blog
Tips for Craft Brewery Success
The best business secrets wikileaked from the private records of the most successful craft breweries in the United States.
Beer Names You Might Be Saying Wrong
Enlighten yourself, but please don't correct others. It's just one of those Catch-69 situations, like when somebody has ketchup on their face.
The Beer Quiz
What's your beer IQ? This test measures an individual’s beer knowledge through a series of questions of varying levels of difficulty: Normal, Hard, and Insane.
Homebrewing Techniques
Beat the Stuck Fermentation Monster
You've brewed the perfect wort. You bullseyed your strike temp, you had a most excellent cold break, your OG was right on the money...
How to Cork Belgian Beer Bottles
So you wanna up your bottling game, huh? Well, you've come to the right place.
Top 40 Ways to Improve Your Homebrew
Admit it: No matter if in a DeLorean, TARDIS, or a hot tub, we’ve all thought about what advice we might give our younger selves if we could go back in time.
DIY Projects
How to Polish a Keg
Shining up your keg will probably not improve the taste of your beer, but it looks cool and inspires epic brewing sessions!
Convert a Refrigerator Into a Fermentation Chamber
Decided to take a huge step in improving your homebrew and set up a temperature controlled fermentation system, have ya? Smart thinking.
How to Convert a Keg Into a Brew Kettle
Convert that old keg into a brewing kettle. The advantages of using a keg for homebrewing pretty much come down to quality and cost.
|
|